In-process Construction pics - Outlaw Car

Secrets, tips, tools, design considerations, materials, the "science" behind it all, and other topics related to building the cars and semi-trucks.
Gameday
Master Pine Head
Master Pine Head
Posts: 277
Joined: Mon Mar 13, 2006 12:50 pm
Location: Madison, WI

In-process Construction pics - Outlaw Car

Post by Gameday »

All,

Every so often I see a post from a new PWD enthusiast asking for step-by-step instructions for building a car so I thought I'd document the process I just went through to build an Outlaw car.

But, let me preface this post by saying that it's a culmination of everything I learned from Stan Pope's on-line manual and from this forum. None of the concepts or construction steps are original ideas that I came up with.

So, here goes:

First, I doodled an design during a boring meeting at work. I then used Excel to make a 7" X 1 3/4" grid paper that helped me accurately make a template. Here's the design I chose:

Image

You can see that I went with a very thin design. I drilled axle holes using a floor drill press and I placed them as high as possible while still maintaining 3/8" clearance under the car. I'm using 1/4" tungsten cubes for weight and this allowed almost all the weight the be level or under the plane of the axles. You can see that I used a scroll saw to cut the shape and that I removed a lot of wood. The final wood weight was about .3 ounces. I know that some builders go for < .2 ounces but I chose to not go that light.

Next, I calculated the weight. I planned to used 4 rows with 6 cubes in each row. I row of 6 cubes weighs 1 ounce. I had to also throw in a .3 ounce lead weight to get to 5 ounces. Here's a pic of the weight. You can also see that I'm using razor wheels premounted on bearings that I bought from MaxV. The total weight not including the epoxy I'll be using plus paint was 4.9 ounces. That was a mistake because after I poured in the epoxy the total weight came to 5.15 ounces and I then had to drill out a little of the lead. No big deal, though. Note that I use a scale from Harbor Freight. I think you can get them on-line for $9.95.

Image

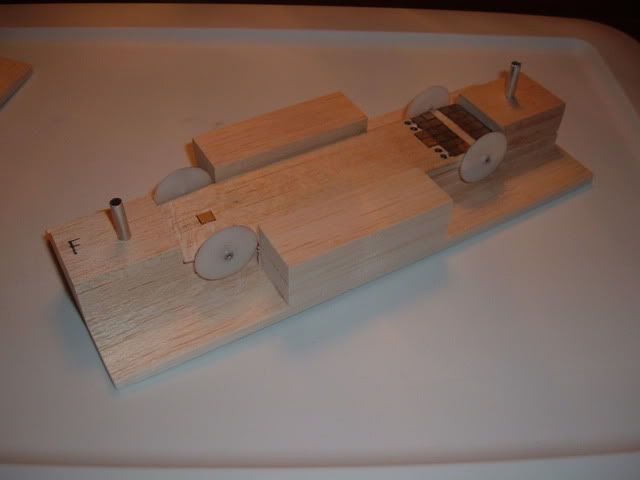
I then got the car ready for pouring the epoxy. I use 5 minute, 2 part epoxy from Devcon:

Image

Here's a pic of the car ready for epoxy. Note that I place it on wax paper and that I tape a small piece of wood on the back to contain the epoxy. That tape also keeps the epoxy from getting in the axle holes.

Image

And here is the car 15 minutes later. Note that the epoxy dries clear and very smooth. The stuff is fantastic to work with.

Image

Even though the directions on the epoxy says it is totally dry after a short time, I let it sit at least a full day to make sure it's fully cured. Then, I use my bench mounted belt sander to sand the small piece of wood off the back of the car and to sand down the top. This took about 1 or 2 minutes. Epoxy is very easy to work with. Note that I placed the car on one of the pieces of grid paper I made using Excel. You can see I laid out the grids so that when I hand drew the design I made sure it was accurately balanced. This is a rail rider and I removed 3/32" of wood from the front right wheel.

Image

And then I was ready for priming and painting. I like to use round toothpicks in the axle holes and then balance it on little blocks. This keeps paint from getting in the holes. The weather here in WI has been around - 25 to - 35 with wind chills so I had to paint inside this year. However, I used a paint mask and fans to deal with the fumes.

Image

I like the Dupli-Color primer/paints and used this combo:

Image

Both dry in about 10 minutes. The high build primer is very forgiving and does a great job of filling imperfections.

And here's the final result. The COM is exactly 5/8" in front of the rear axle. I ran a few tests on a 32' Piandosi 3-lane track and ran sub 2.3's. My son's Pack and District winner runs 2.35's. I was expecting the Outlaw to be a bit faster than it is but I'm still happy with it. Total construction time was less than 2 hours, and the work was done in 15 minute increments over 10 days. I hope you find this post useful.

Image
User avatar
CM924
Master Pine Head
Master Pine Head
Posts: 123
Joined: Sun Jan 20, 2008 10:35 am
Location: Nashville, TN

Re: In-process Construction pics - Outlaw Car

Post by CM924 »

Awesome job
Jeff
Cubmaster Pack 924
doct1010
Pine Head Legend
Pine Head Legend
Posts: 1300
Joined: Wed Dec 21, 2005 5:06 pm

Re: In-process Construction pics - Outlaw Car

Post by doct1010 »

Very nice! Wheel bearings! :shock: I liiiiiike it!
doct1010
Pine Head Legend
Pine Head Legend
Posts: 1300
Joined: Wed Dec 21, 2005 5:06 pm

Re: In-process Construction pics - Outlaw Car

Post by doct1010 »

I ran a few tests on a 32' Piandosi 3-lane track and ran sub 2.3's. My son's Pack and District winner runs 2.35's. I was expecting the Outlaw to be a bit faster than it is but I'm still happy with it.
What did you use for lube in bearings?
Gameday
Master Pine Head
Master Pine Head
Posts: 277
Joined: Mon Mar 13, 2006 12:50 pm
Location: Madison, WI

Re: In-process Construction pics - Outlaw Car

Post by Gameday »

doct1010 wrote: What did you use for lube in bearings?
The MaxV instructions state that they're pre-lubed but that you can use a drop of sewing machine oil, if necessary. I'm planning to run 'em the way they came out of the box.

There is a big regional open derby this Saturday (3/1) and I'll post an update on how we did.

Bubba, if you want to come it's in Dodgeville and there are a wide range of classes including scouts, parents/leaders, and Outlaw.

Thanks for the comments, guys.
User avatar
davem
Master Pine Head
Master Pine Head
Posts: 196
Joined: Sat Jan 24, 2004 9:14 pm
Location: Wellington, Florida

Re: In-process Construction pics - Outlaw Car

Post by davem »

Love the spray booth!
User avatar
ohiofitter
Master Pine Head
Master Pine Head
Posts: 693
Joined: Sat Feb 03, 2007 10:30 am
Location: Uniontown,Ohio

Re: In-process Construction pics - Outlaw Car

Post by ohiofitter »

Beautiful looking car Gameday...love the breakdown of the build
doct1010
Pine Head Legend
Pine Head Legend
Posts: 1300
Joined: Wed Dec 21, 2005 5:06 pm

Re: In-process Construction pics - Outlaw Car

Post by doct1010 »

Gameday wrote: The MaxV instructions state that they're pre-lubed but that you can use a drop of sewing machine oil, if necessary. I'm planning to run 'em the way they came out of the box.
Yes they are pre-lubed, with what is the question. Razors and bearings should be smokin. My two cents, considering time and money alraedy spent, flush 'em out and put a drop or two of Krytox in. SB10 is a bike lube that is available at most high end shops, it is a bit higher viscocity than the 100 we run, but may be just the ticket for the bearing.
Gameday
Master Pine Head
Master Pine Head
Posts: 277
Joined: Mon Mar 13, 2006 12:50 pm
Location: Madison, WI

Re: In-process Construction pics - Outlaw Car

Post by Gameday »

doct1010 wrote:
Gameday wrote: The MaxV instructions state that they're pre-lubed but that you can use a drop of sewing machine oil, if necessary. I'm planning to run 'em the way they came out of the box.
Yes they are pre-lubed, with what is the question. Razors and bearings should be smokin. My two cents, considering time and money alraedy spent, flush 'em out and put a drop or two of Krytox in. SB10 is a bike lube that is available at most high end shops, it is a bit higher viscocity than the 100 we run, but may be just the ticket for the bearing.
Thanks for the advice. Any suggestions on flushing them out? I'm not sure how to do that.
doct1010
Pine Head Legend
Pine Head Legend
Posts: 1300
Joined: Wed Dec 21, 2005 5:06 pm

Re: In-process Construction pics - Outlaw Car

Post by doct1010 »

Denatured alcohol bath or if you have access to a syringe this makes it easier. Allow to dry completely before Krytox app., blow dry compressed air in prior to app and a shot after to clear excess. Spin it in and run it 2-3 times for break-in.
GrantnHayden
Master Pine Head
Master Pine Head
Posts: 114
Joined: Sun Mar 11, 2007 8:11 pm
Location: Fenton, Michigan

Re: In-process Construction pics - Outlaw Car

Post by GrantnHayden »

Wow, excellent work both in the post and the car process! I liked the tooth picks in the axles idea. Sweet design too.

How did you align? Did it need aligning?

I agree with flushing the bearings if they are not sealed. MaxV may be able to get you the lube type that they came with. If it is viscous (like grease for heaven's sake!), then Doc's recommendation makes good sense and could be your ticket to the low 2.0 range....who knows!

Very nice!
Gameday
Master Pine Head
Master Pine Head
Posts: 277
Joined: Mon Mar 13, 2006 12:50 pm
Location: Madison, WI

Re: In-process Construction pics - Outlaw Car

Post by Gameday »

GrantnHayden wrote:Wow, excellent work both in the post and the car process! I liked the tooth picks in the axles idea. Sweet design too.

How did you align? Did it need aligning?

I agree with flushing the bearings if they are not sealed. MaxV may be able to get you the lube type that they came with. If it is viscous (like grease for heaven's sake!), then Doc's recommendation makes good sense and could be your ticket to the low 2.0 range....who knows!

Very nice!
Thanks. Regarding aligning, I might be missing something but it doesn't look like there is much I can do since the wheels are seated directly to the axle with no lateral movement. So, I was extremely careful to be sure I drilled the axle holes at precisely 90 degrees. I did a 4' roll test and the car rolls dead on with no deviation. I built the car to be a RR but haven't shimmed the RF wheel yet.
User avatar
Go Bubba Go
Pine Head Legend
Pine Head Legend
Posts: 1190
Joined: Sat Nov 18, 2006 12:09 pm
Location: Northern, Illinois

Re: In-process Construction pics - Outlaw Car

Post by Go Bubba Go »

Gameday wrote:There is a big regional open derby this Saturday (3/1) and I'll post an update on how we did.

Bubba, if you want to come it's in Dodgeville and there are a wide range of classes including scouts, parents/leaders, and Outlaw.
Only two problems:

1) My wife will be out of town that weekend, so I'll have all the kids

2) My Outlaw car will be out of town that weekend, up North with Mr. Slick for a league race.

Still hoping to make it up on the 8th. Perhaps we can squeeze in an "unofficial" Outlaw race if mine's back in time. :wink: No paint, just lacquer. We call her "Disclosure".

Image

Bubba
"Who's Grandpa's neighbor?"... Phil Davis, Down and Derby
User avatar
woodworx
Master Pine Head
Master Pine Head
Posts: 137
Joined: Sun Feb 10, 2008 9:24 pm
Location: southern,wisconsin

Re: In-process Construction pics - Outlaw Car

Post by woodworx »

Gameday,

Where is the race in Dodgeville? That is only 20 min. North of us.
Gameday
Master Pine Head
Master Pine Head
Posts: 277
Joined: Mon Mar 13, 2006 12:50 pm
Location: Madison, WI

Re: In-process Construction pics - Outlaw Car

Post by Gameday »

woodworx wrote:Gameday,

Where is the race in Dodgeville? That is only 20 min. North of us.
Here is the info: http://www.mhscouts.com/2008DistrictPW.pdf

By the way, the date on the flyer is wrong. It should state Saturday, 3/1.

Let me know if you come.
Post Reply