Bore prep

Re: Bore prep
I echo wordworx kudus. Thanks Sporty.
-
Ten Thumb Tom

- Pine Head

- Posts: 56
- Joined: Tue Jan 06, 2009 5:16 am
- Location: Texas, USA
Re: Bore prep
Correct, people are discussing regular Micro-Mesh on the wheel bores, not AO (aluminum oxide). Micro-Mesh only produces AO in 2400, 4000 & 12000.justenough wrote:5Js' statement that he ordered the REGULAR micro mesh, as opposed to the aluminum oxide or the one designed for metals, made me wonder (1) are the results folks on here reporting done with the regular micro mesh (I would assume that is the right choice for plastic) and (2) are the folks who are also using micro mesh for their axles using one of the versions designed for harder materials?
Let me also add to the kudos for Sporty for sharing this process to begin with and to the others for helping and reporting on it. I'm a relative novice who has learned much from the posts here and elsewhere on the board, and I have to say that the posts on this topic -- with their detail as to methods, results and even where to buy, and the video posted by Sporty -- they really set the standard for informative and easy to follow (and selfless) advice Thanks much to all of you, most of all Sporty.
I too applaud Sporty's decision to share his research, but I also support those who believe that Sporty should offer the people an option to purchase his "Lightening Rods" directly from him. Sporty's role in the pinewood derby community is a brethern, but the fact is, it takes a significant investment to purchase the supplies for this process if the scout only intends to produce a few sets of wheels. I support those who strongly encourage Sporty to at least offer an option to fellow enthusiasts to simply purchase the finished product from Sporty, the inventor.

Re: Bore prep
Anyone have test times using this bore prep process?
"One test is worth a thousand opinions." - Werner von Braun
"One test is worth a thousand opinions." - Werner von Braun
Re: Bore prep
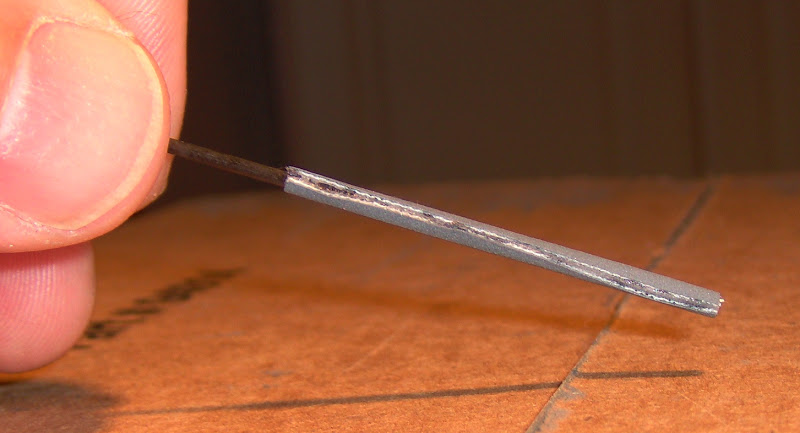
OK, just how small of a piece do you use??? Do you cut a thin strip and spiral it around the rod, or what? I'm having a heck of a time figuring out how to get it onto something so small.sporty wrote:That small piece, is able to get allot of strips for the bore rods.
i do not recommend attempting more than 4 wheels per rod. Best results are one prep rod per wheel. but doing 4 wheels turns still very good results.
Sporty
Tempus fugit. Frater, memento mori.


Re: Bore prep
Did you watch the video of me making them ?
It's not a spiral, its a even wrap around the rod. the adheasive backing sticks to the rod. they are typically about 3/16th thick.
Sporty
It's not a spiral, its a even wrap around the rod. the adheasive backing sticks to the rod. they are typically about 3/16th thick.
Sporty
Re: Bore prep
davem wrote:Anyone have test times using this bore prep process?
"One test is worth a thousand opinions." - Werner von Braun
Yeps he blew up allot of rockets before getting them to work !
Yes I thought I posted my improvement time some where on the topic.
sporty
Re: Bore prep
We just finished polishing our axles this way. They look amazing!
We found the micromesh assorted package at our local hobby store packaged under the Revell name. Unfortunately it is not the adhesive backed kind. We are under some time constraints (our race is Sat.) so we won't be able to get them in time for the race. Considering our situation what is the best way to attach them to the rods or did someone else come up with another way to attached the non adhesive micromesh to the drill chuck?
Thanks!
Last edited by DKO on Tue Mar 09, 2010 7:12 pm, edited 1 time in total.
Re: Bore prep
Hmm, revell is getting there claws in everywhere these days.
Try 3m super 77 adheasive spray or double sided tape.
Sporty
Try 3m super 77 adheasive spray or double sided tape.
Sporty

Re: Bore prep
"Practice makes perfect" with doing this bore prep method. Measure the diameter of the rod and use the following formula: C = 2 * 3.14 * diameter/2. I know > getting to anal > showing my engineering side. 
It wasn't easy at first, but I can do it in my sleep now. My Cub did the actual polishing on his cars but he had a very hard time getting the clear backing off the adhesive-backed sandpaper. I use the carbon rod to remove the clear backing off of the adhesive-backed sand paper once it is cut to shape.
We are still using a sanded-down carbon fiber rod @ 0.052" diameter. The handle (where you hold the rod) portion is thicker. We rotate the wheel in our baby Harbor Freight Lathe so we actually use a thinner strip of sandpaper than the actual circumference of the rod. We don't rub the area of the rod-sandpaper where the sandpaper comes together (splice).
You will feel a "resistance" when the abrasive wears-away during the polishing process. It doesn't take long to feel this resistance. I would say 10 seconds with using a lathe. Everything is so subjective because of rpm variance.
We used water when doing this process but lately, we are going dry. Take care when handling the rod. I got a splinter in my finger and had to take it out with tweezers and a few cuss words.
I guess I should make a video of the way we do this. We already did one of my Cub doing the polishing but it should be redone.
I have seen the results under a microscope compared to pipe cleaner/plastic polish method. No comparison.
I cannot say you will get better times but doing the process will certainly not hurt your chances of winning a race. We are getting faster and did pretty good this year in pack and district using this process. But we also did a lot of other things that got us speed. The old Cub Scout motto: We did our best! . You got to love this stuff!
It wasn't easy at first, but I can do it in my sleep now. My Cub did the actual polishing on his cars but he had a very hard time getting the clear backing off the adhesive-backed sandpaper. I use the carbon rod to remove the clear backing off of the adhesive-backed sand paper once it is cut to shape.
We are still using a sanded-down carbon fiber rod @ 0.052" diameter. The handle (where you hold the rod) portion is thicker. We rotate the wheel in our baby Harbor Freight Lathe so we actually use a thinner strip of sandpaper than the actual circumference of the rod. We don't rub the area of the rod-sandpaper where the sandpaper comes together (splice).
You will feel a "resistance" when the abrasive wears-away during the polishing process. It doesn't take long to feel this resistance. I would say 10 seconds with using a lathe. Everything is so subjective because of rpm variance.
We used water when doing this process but lately, we are going dry. Take care when handling the rod. I got a splinter in my finger and had to take it out with tweezers and a few cuss words.
I guess I should make a video of the way we do this. We already did one of my Cub doing the polishing but it should be redone.
I have seen the results under a microscope compared to pipe cleaner/plastic polish method. No comparison.
I cannot say you will get better times but doing the process will certainly not hurt your chances of winning a race. We are getting faster and did pretty good this year in pack and district using this process. But we also did a lot of other things that got us speed. The old Cub Scout motto: We did our best!
SHINING LIGHT Pinewood Derby & Audio
-
Jeff Piazza
- Pine Head
- Posts: 83
- Joined: Thu Apr 10, 2008 12:49 pm
- Location: Wellesley, Massachusetts
Re: Bore prep
Here's a thousand words that may help.roosclan wrote:OK, just how small of a piece do you use??? Do you cut a thin strip and spiral it around the rod, or what? I'm having a heck of a time figuring out how to get it onto something so small.
Re: Bore prep
Well, I don't have a microscope to use, but I've tried sporty's process on some spare wheels using 3M WetorDry polishing paper and a .060" carbon fiber rod. The bore is very shiny! Using the .060" rod does not work to stick the rod in the drill, as it diameter is too small for the wheel bore. However, it works fine if you mount the wheel in the chuck of the drill and keep the rod stationary, moving in and out, as someone else posted. The 3M stuff is much thinner than the Micromesh, so you need a .070" rod to get a tighter fit. You will also need some spray adhesive to spray the rod & attach the polishing paper. We don't have time to get more rods before Test & Tune tonight or the race on Saturday, or get Micromesh, so this will have to do for this year. It's more work, but to the naked eye, it looks better than last year's pipe cleaner and ScratchX treatment.
Tempus fugit. Frater, memento mori.
Re: Bore prep
We finally got to this step. Used the 0.055 rod and recommended set of adhesive backed MM. After a DAD error leaving the drill press on too high of a speed runied one set of wheels 
 (hard to pay attention to everything some times), we did ours at 300 rpm and added a couple of seconds to each side due to running a half the speed Sporty was. We also gave them a quick cleaning with denatured alcohol and blew them out with compressed air. They look great, but I don't have speed test data to compare.
I did check bore diameter before and after. Fit a 0.097 pin gauge before and after. Did not fit a 0.098 afterwards. I don't have the in-between size, so that is all I know about the net result on diameter.
I did check bore diameter before and after. Fit a 0.097 pin gauge before and after. Did not fit a 0.098 afterwards. I don't have the in-between size, so that is all I know about the net result on diameter.
Re: Bore prep
Thanks for the update quadad, I look forward to hearing how Sporty's Bore Prep works for you. I hope we get to prepping wheels this week. We are in the process of building four cars - my youngest boy is building a coupe, my Wolf Scout if building a "camaro" type car, my eldest daughter is building a wedge, and I am building a 1/4" slab (well I guess that's what it is). This is the first year we are doing a parent/sibling/local business race - I have one excited family - well - Mom is at least supportive.....
Anyway - once we get to bore prep ala Sporty - I will post results.
One question - I know some have cut wheels in half to "scope" the bore. I am willing to prep a couple of spares to cut in half to scope, but am wondering what the best way to cut them down the bore. I have a scroll saw and I have a 42 TPI Razor Saw.
Last edited by *5 J's* on Wed Mar 10, 2010 4:51 am, edited 1 time in total.
-
Jeff Piazza
- Pine Head
- Posts: 83
- Joined: Thu Apr 10, 2008 12:49 pm
- Location: Wellesley, Massachusetts
Re: Bore prep
Speaking for myself, I just ran the wheels through the scroll saw. The plastic chips end up electrostatically charged, so they cling to everything, but some care with a chip brush seems to remove them OK. I should have, but didn't, blow them clean with some canned air, something I hope to get around to soon.*5 J's* wrote:One question - I know some have cut wheels in half to "scope" the bore. I am willing to prep a couple of spares to cut in half to scope, but am wondering what the best way to cut them down the bore. I have a scroll saw and I have a 42 TPI Razor Saw.
