Derby Talk is a forum for Pinewood Derby, Awana Grand Prix, Kub Kar Rally, Shape N Race Derby, Space Derby, Raingutter Regatta and other similar races where a child and an adult work together to create a race vehicle and a lot of fun and memories
davet wrote:1) You should certainly make it a railrider as was mentioned earlier. We ran 3.5"-4" of steer. Narrow the body at the DFW 1/16" to prevent the rear wheel
behind it from rubbing the rail.
2) Use Lightninboy's rear wheel alignment method as seen in a video here and elsewhere. Bent axles align perfectly with this method.
3) 3 degree cant on rear axles
4) 8 degree on DFW
5) Delrin washers on the body. If not, at least put some of your wife's hardest clear nailpolish on the body where the wheel will make contact. Let it harden
a couple days then sand to very fine grit and polish. Put a junk axle in the axle hole then put the polish on. This will keep the polish out of the hole.
6) Are you putting Pledge on your axles prior to graphite?
7) Maybe I missed it, is oil not allowed? (don't know how this emoji got here, sorry. Can't get rid of it) Make little notches on the side of the body at the back wheels so if the cant is too much or the wheel gap is very small, the wheels don't rub the top edge of the body.
9) We cut a pocket between the rear axles for 2 cubes of tungsten. The plywood mentioned above helps keep the rear strong when doing this.
Wow.. Again thanks and we truly appreciate it. OK on almost all the details and we have not done that previously (wish I found this forum a couple if years ago)... 7. Can not use oil... 6. Pledge? Had not heard that before... Does it help the graphite stick and therefore keeps a less friction surface.. Any issues with it gumming up? Wow I had not thought of many of the others..
We cut our entire center section out all the way through AFTER we had put the 1/64" plywood on. The top was covered with whatever pic he wanted and the bottom we covered with packing tape. We would use glue on the edges of the tape so it didn't pull off of the car at the stop section.
We got our wood from a local hobby shop but I believe Menards has it too but in bigger sheets.
Search the Pledge thing. We didn't hear about it until we moved to oil. Seems to be the common graphite speed tip.
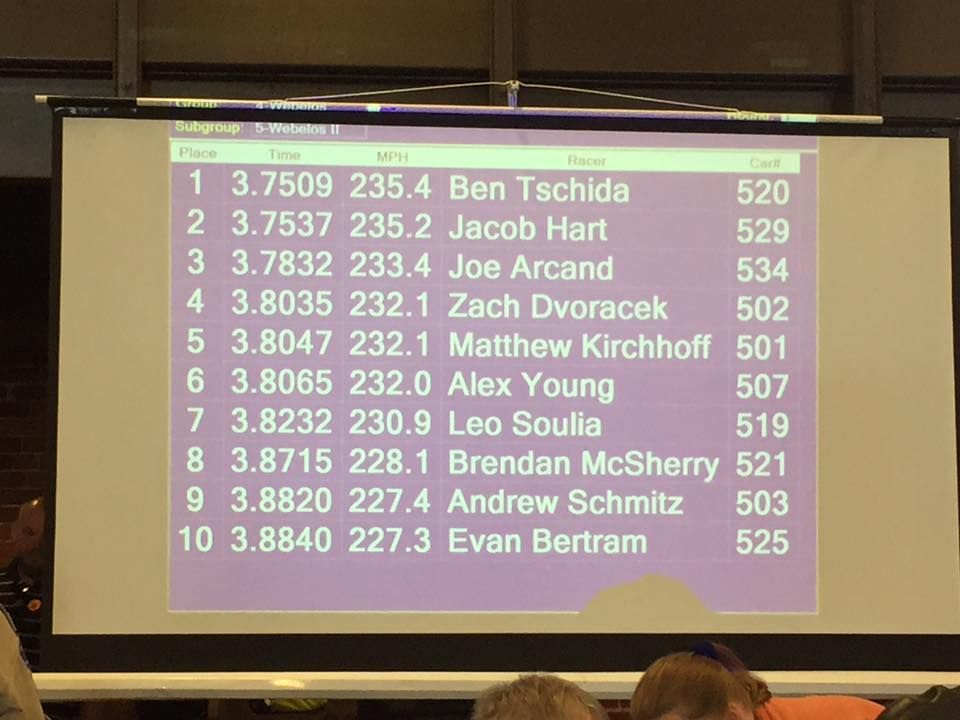
These are our times on the long track last year using the specs I posted earlier in this thread
These are the standings from that same race. Every small detail makes a difference
davet wrote:We cut our entire center section out all the way through AFTER we had put the 1/64" plywood on. The top was covered with whatever pic he wanted and the bottom we covered with packing tape. We would use glue on the edges of the tape so it didn't pull off of the car at the stop section.
We got our wood from a local hobby shop but I believe Menards has it too but in bigger sheets.
These are our times on the long track last year using the specs I posted earlier in this thread
These are the standings from that same race. Every small detail makes a difference
What length of track was that on.. Did you say 52 ft earlier.... Got it on the plywood... AFTER so that you can minimize the possibility of twisting. But you route out the area prior to adding the 1/64"plywood so it will be easier to take out the top but not cutting through the plywood bottom so you have a solid clean flat bottom. Do you do the same for the weight areas as well as the blank areas?
I truly like the top idea with the photo paper and 60 minute epoxy... Why 60 minute? Does it give you more time to smooth it out over the area and do you cover the entire top with the epoxied photo paper like a veneer. Once these veneers are installed you can sand so that your paint or cover will seamlessly look smooth with edges etc. ?
I almost feel my son could give this a shot with the current car from pack and retro these on too it..pull the axles and begin retro. If it doesn't work at least he got good practice on the concepts and ideas before starting a complete new one.
Sent from my Note 5 using Tapatalk
I re read your statement and see that you are routing the entire area AFTER putting on the bottom.. But for the weight areas... Do you route them first them leave the 1/64 bottom on for the weight to rest on before epoxy them jn place.
I searched and found exact length of the NSC Council track, 51.75' pin to finish line.
We start with our block cut down to about 3/8" to 1/2" thick. We then drill axle holes. Next, we put the plywood on the bottom of the block. We then make our weight pockets from the bottom. The cubes will then lay in the pocket and get glued there. Six 1/4" cubes centered on the block leave about 1/16" of wood on either side. Leave that wood on either side to help glue the cubes in solidly. After we get all of our cubes glued in ( to maintain rigidity ) we cut out the center section, add two 1/4" balsa braces in the opening, then start sanding the top down. The top of the cubed weights will now be exposed as you sand the top down.
This is just how we did it to make sure strength was not compromised. Others that are more experienced probably have a better way that maintains strength.
A guy we raced against last year bought a superlight ladder body from a Pro racer. I saw it before he installed anything. The axle holes were already drilled. I layed it on the window and found it was warped slightly. Maybe not an issue once it's all put together but ours did not warp. We beat that pro-bodied car. Just take your time.
davet wrote:I searched and found exact length of the NSC Council track, 51.75' pin to finish line.
We start with our block cut down to about 3/8" to 1/2" thick. We then drill axle holes. Next, we put the plywood on the bottom of the block. We then make our weight pockets from the bottom. The cubes will then lay in the pocket and get glued there. Six 1/4" cubes centered on the block leave about 1/16" of wood on either side. Leave that wood on either side to help glue the cubes in solidly. After we get all of our cubes glued in ( to maintain rigidity ) we cut out the center section, add two 1/4" balsa braces in the opening, then start sanding the top down. The top of the cubed weights will now be exposed as you sand the top down.
This is just how we did it to make sure strength was not compromised. Others that are more experienced probably have a better way that maintains strength.
A guy we raced against last year bought a superlight ladder body from a Pro racer. I saw it before he installed anything. The axle holes were already drilled. I layed it on the window and found it was warped slightly. Maybe not an issue once it's all put together but ours did not warp. We beat that pro-bodied car. Just take your time.
Got it . awesome times on that length of track..
When sanding the top down are you using a belt sander, hand sander, something else @120 grit?
Started out just having my son run it back and forth on a sheet of paper. I would first make a horizontal line along the side at 1/4" thick. This way he knew how much to take of and if the front or rear needed more pressure. Not sure what grit but probably 60 to start to make it go faster.
Last year we used a belt sander that I would clamp upside down to the workbench. We tapered the front down and near end of build would put a thin coat of epoxy on the front edge to prevent it from splitting or cracking.
Are you doing anything to the wheels to make sure the round and true to the bores as well?
Seen where you talked about your sons polishing job to bored and axles.
And that you were looking for that ahh!!!
That's what was over looked!
Just an out of round wheel alone can scrub off speed as well!
So thought I'd ask the question.
Sent from my iPhone using Tapatalk
What type of automobile can be spelled the same forwards & backwards?
whodathunkit wrote:Are you doing anything to the wheels to make sure the round and true to the bores as well?
Seen where you talked about your sons polishing job to bored and axles.
And that you were looking for that ahh!!!
That's what was over looked!
Just an out of round wheel alone can scrub off speed as well!
So thought I'd ask the question.
I've given up attempting to correct out-of-roundness without an actual lathe. (Though, one of these days I do want to finish my idea for a micro-lathe...). Instead, we just buy a few extra tubes of wheels and pick the best we can find for them.
I used to try to get the absolute lowest radial runout, but now I look for wheels of .003" or less that have tight bores and a good spin. If the wheel is true on the outside, but wobbly and loose in the bore, I think that's nearly as bad. Some of the wheels we rejected, though, had runout as high as .011(!)
Check the tread surface at the outer edge and on the inner edge. This helps find the wheels best for DFW and rears. We had wheels as much as .005 difference between outer edge and inner edge on the tread surface.
whodathunkit wrote:Are you doing anything to the wheels to make sure the round and true to the bores as well?
Seen where you talked about your sons polishing job to bored and axles.
And that you were looking for that ahh!!!
That's what was over looked!
Just an out of round wheel alone can scrub off speed as well!
So thought I'd ask the question.
Sent from my iPhone using Tapatalk
Yes we have been checking the wheel shapes... Been doing what Vitamin K suggested and buying several wheels and choosing the best. Thank you for checking.
We got up early this morning and based on davet's description drew out an example on a piece of wood for the car cutout... We have been using 3/16" tungsten. Let me know if it looks like we have an understanding currently or should change to 1/4" for a particular reason.
So your plan is to us 52 cubes total.. and have 16 cubes at just a touch over 1 ounce behind the axle.. and 36 cubes at approx 3.5 oz in front of the axle.
With 4 of them going between the axles!
Can't tell you if that's a good thing or a bad thing!
However what i can tell you is this.. even at 1/4'' wide plum across for the axle support..
if the car sets to long on it wheels with the weight they have been known to warp plus the down pressure coming off the slope can crack the axle support of a stiffener is not use.
Best i can recall reading somewhere about the pressure down forced on a pinewood derby car coming off the slope is that it can reach upwards to 15 oz.
( But don't quote me on that!)
So be thinking about it in your design!
Hay this race is about trying new things and taking chances with designs to find what works .. and that's the fun of it!
Last edited by whodathunkit on Tue Jan 31, 2017 5:14 pm, edited 1 time in total.
What type of automobile can be spelled the same forwards & backwards?
whodathunkit wrote:So your plan is to us 52 cubes total.. and have 16 cubes at just a touch over 1 ounce behind the axle.. and 36 cubes at approx 3.5 oz in front of the axle.
however 4 of between the axles! can't tell you if that's a good thing or a bad thing!
however what i can tell you is this.. even at 1/4'' wide plum across for the axle support..
if the car sets to long on it wheels with the weight they have been known to warp plus the down pressure coming off the slope can crack the axle support
if a stiffener is not use. Best i can recall seeing somewhere the pressure down forced on the car coming off the slop can reach upwards to 15 pounds.
( But don't quote me on that!)
So be thinking about it in your design!
Hay this race is about trying new things and taking chances with designs to find what works .. and that's the fun of it!
Good info... Thanks... I had the 3/16" tungsten weighing 1 oz for approximately 15 cubes... will 36 be around 2.4 oz is that correct? With wheels and axles weighing around .5 oz + 36 at 2.4 oz + 16 at just over 1oz.. The weight of the body could be up to 1 oz which is heavy. Looks I may need to add more weight somewhere.
Regarding the weight and warping I think that is why davet said he adds a bottom 1/64" plywood with epoxy at opposite grain direction to give the body more stiffness prior to cutting this out... You just can't see it in the drawing. Truly appreciate the feedback. This may be a good reason to move up to 1/4" tungsten cubes and just a little thicker car.. That extra 1/16" thickness of tungsten in height will add up. Without putting so much so far in front of the rear axles.
The smaller cubes don't pack as much weight behind the rear axle because they're not as thick as the body. I would use the smaller cubes in back but keep them up towards the top portion of the 1/4" thick body. Then, below the cubes use tungsten putty to make up the difference. Don't spread those small cubes so far forward of the rear axle. Put a couple rows in then add plates putty below those also. Once you have the weight you want, spread a thin layer of thin CA glue on the bottom of the putty to keep it from getting snagged on the stop section.

(don't know how this emoji got here, sorry. Can't get rid of it) Make little notches on the side of the body at the back wheels so if the cant is too much or the wheel gap is very small, the wheels don't rub the top edge of the body.