Some of my previous cars

Show off your cool vehicle designs and track burning speedsters!
Post Reply
User avatar
derby doc
Merchant
Merchant
Posts: 54
Joined: Wed Jul 04, 2007 2:02 pm
Location: Greer, SC
Contact:

Some of my previous cars

Post by derby doc »

I enjoy seeing everyone post pics of their cars, and paint jobs. I thought that I would show a few of mine.
Image
Image
Image
Image
User avatar
GravityRacer
Master Pine Head
Master Pine Head
Posts: 477
Joined: Mon Mar 17, 2008 6:39 pm
Location: Simi Valley, CA

Re: Some of my previous cars

Post by GravityRacer »

Woah! I thought my cars were smooth, but when I can see the fluorescent fixture bulbs at a total distance of about 10 feet (up and back to the fixture to the camera- pic 3), that is SLICK!
User avatar
woodworx
Master Pine Head
Master Pine Head
Posts: 137
Joined: Sun Feb 10, 2008 9:24 pm
Location: southern,wisconsin

Re: Some of my previous cars

Post by woodworx »

Incredible work Doc I especially like the Harley car.
User avatar
millettbbc
Master Pine Head
Master Pine Head
Posts: 322
Joined: Thu May 22, 2008 8:37 am
Location: Lansing, MI
Contact:

Re: Some of my previous cars

Post by millettbbc »

Very nice. A true PWD master. Someday people like me will be like people like you but for today we only wish we were.
PWD: The bug everyone catches and no one wants to let go.
DerbyDoDo
Pine Head
Pine Head
Posts: 97
Joined: Tue Dec 12, 2006 12:47 pm
Location: Ohio, USA

Re: Some of my previous cars

Post by DerbyDoDo »

Great cars!!! How did you do the two colors on the harley car? Paint it one color and then tape it off for the second color?
User avatar
derby doc
Merchant
Merchant
Posts: 54
Joined: Wed Jul 04, 2007 2:02 pm
Location: Greer, SC
Contact:

Re: Some of my previous cars

Post by derby doc »

DerbyDoDo wrote:Great cars!!! How did you do the two colors on the harley car? Paint it one color and then tape it off for the second color?
Yes, I always spray the light color first, then I use some 1/8" wide tape that I get from a body supply store to tape the car. Its very easy to tape up curves, and stuff. You could even create circles with the tape since its so flexible.
User avatar
smartyman
Pine Head
Pine Head
Posts: 61
Joined: Mon Oct 06, 2008 6:24 pm
Location: Kent, WA

Re: Some of my previous cars

Post by smartyman »

WOW, incredible looking.

What is your paint equipment? Rattle cans or something more advanced?

My wife is looking for Christmas gift ideas and I've been thinking I should go for some paint stuff but I don't even know what to ask for.
User avatar
derby doc
Merchant
Merchant
Posts: 54
Joined: Wed Jul 04, 2007 2:02 pm
Location: Greer, SC
Contact:

Re: Some of my previous cars

Post by derby doc »

smartyman wrote:WOW, incredible looking.

What is your paint equipment? Rattle cans or something more advanced?

My wife is looking for Christmas gift ideas and I've been thinking I should go for some paint stuff but I don't even know what to ask for.
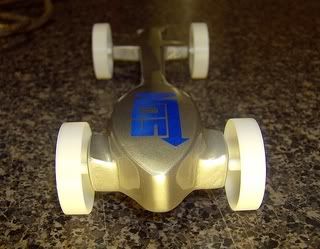
I use a small 3 gallon compressor, and a harbor freight gravity feed spray gun. I use an airbrush (gravity feed) for the graphics, and then I clear coat the cars with Kustom Shop auto urethane. Its a little pricey, but I could probably clear coat over 50 cars with a quart.
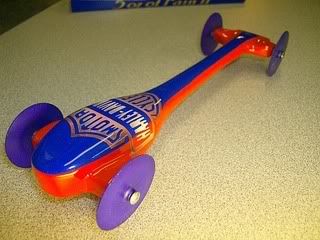
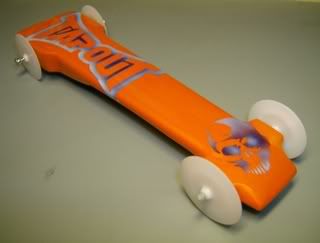
I like the gravity feed guns because a little paint goes a long way with that type of gun, and the auto urethane can make a decent paint job look like a pro did it. On the Harley car, Tapout car, and the brick car, I used a vinyl plotter to cut stencils for the graphics.
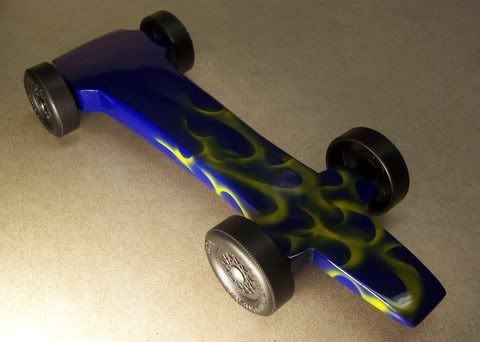
The blue car with the true fire flames, I bought a set of the true fire mini stencils by kustom shop. Its a fun way to airbrush. Youtube has a lot of excellent airbrush videos. Thats where I learned from.
User avatar
sporty
Pine Head Legend
Pine Head Legend
Posts: 3344
Joined: Sun Feb 13, 2005 1:00 am
Location: rockfalls, Illinois

Re: Some of my previous cars

Post by sporty »

They look good and even better, is that they are fast.


Sporty
User avatar
smartyman
Pine Head
Pine Head
Posts: 61
Joined: Mon Oct 06, 2008 6:24 pm
Location: Kent, WA

Re: Some of my previous cars

Post by smartyman »

derby doc wrote:I use a small 3 gallon compressor, and a harbor freight gravity feed spray gun...
Thanks for the info. I'll definitely be looking into it!
User avatar
ohiofitter
Master Pine Head
Master Pine Head
Posts: 693
Joined: Sat Feb 03, 2007 10:30 am
Location: Uniontown,Ohio

Re: Some of my previous cars

Post by ohiofitter »

Your cars look great......do you use auto paint for the base paint or is a airbrush paint used
User avatar
derby doc
Merchant
Merchant
Posts: 54
Joined: Wed Jul 04, 2007 2:02 pm
Location: Greer, SC
Contact:

Re: Some of my previous cars

Post by derby doc »

ohiofitter wrote:Your cars look great......do you use auto paint for the base paint or is a airbrush paint used
I get my paint from this place.........
http://www.tcpglobal.com/kustomshop/
The 2 oz and 4 oz bottles last forever when your painting cars this small. I use it for my base coat, and my graphics. I buy the Kustom Shop auto clear on this site also. A word of warning , I dont like the kandy's. Theyre a lot of trouble for me for some reason. I stick to the pearls.
DerbyDoDo
Pine Head
Pine Head
Posts: 97
Joined: Tue Dec 12, 2006 12:47 pm
Location: Ohio, USA

Re: Some of my previous cars

Post by DerbyDoDo »

Is the wood for the axles the same as the body block? Or did you glue those on seperate? And I assume most of the weight is above the rear axle? Just wondering how everything is placed in that car. Looks great but seems like a challenge for the weight placement.
User avatar
derby doc
Merchant
Merchant
Posts: 54
Joined: Wed Jul 04, 2007 2:02 pm
Location: Greer, SC
Contact:

Re: Some of my previous cars

Post by derby doc »

I was lucky enough to find this picture of the car before it was shaped up, and painted. It was a challenge to get the car to 5 oz. I actually used lead to weight the car also. I melt it myself, and pour it directly into the pocket so there are no voids like tungsten would have. Its a little hard to see, but theyre are 3 pockets milled underneath the car. The long narrow groove was to reduce weight on the front of the car. The car was made from a piece of pine shelving board that I milled to be square, and true before cutting the design.

Image

Here is the other car in the above photo after it was finished. I was copying WarpSpeeds designs a little when I built these cars.

Image
User avatar
millettbbc
Master Pine Head
Master Pine Head
Posts: 322
Joined: Thu May 22, 2008 8:37 am
Location: Lansing, MI
Contact:

Re: Some of my previous cars

Post by millettbbc »

again... very nice. After cars like this we are all started to expect a lot out of you. Keep 'em coming!
PWD: The bug everyone catches and no one wants to let go.
Post Reply